- Log in to Nexcloud at siirto.findata.fi
- Log into all Findata services and systems using the same authentication method.
- Verify that the diary number is correct.
- The front page shows a folder with the title of the data permit decision’s diary number.
- Open the folder and check that the diary number in the file journal_number.txt is also correct.
- Create a new folder on your computer. Ensure that only individuals authorised to handle the data have access to this folder.
- Download the following files from Nextcloud to the folder:
- Findata Encryption Tool (found in folder named Encryption Tools)
- csc.pub (found in folder named Encryption Tools)
- the journal_number.txt file
To download the file, click the three dots after the file and select ‘Download’.

- Compress all the files you want to transfer into a single .zip file and move them to the folder you previously created
- Make sure that the zip file size does not exceed 4 GB
- Include in the .zip file the data descriptions
- Include in the .zip file the data descriptions
- Do not password protect the .zip files
- Make sure the file is in the format specified in the data delivery request
- Make sure that the file name does not contain spaces or special characters (/,? +) [). The following special characters are permitted: dots, hyphens, and underscores (.- _)
- Open from the folder the Findata Encryption Tool
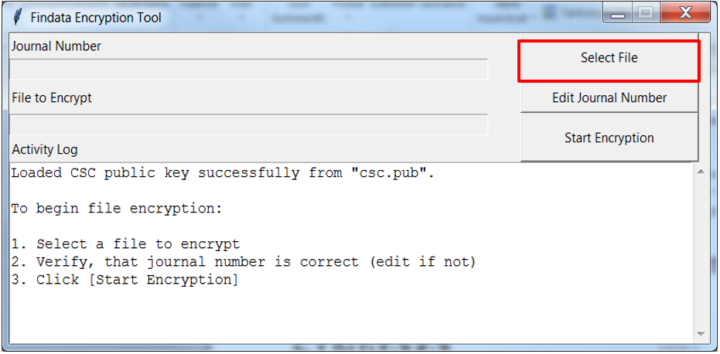
- Select the file for encryption
- The file you are encrypting is the zip file you created in step 5. Select a file by pressing ‘Select File’ (see image below)

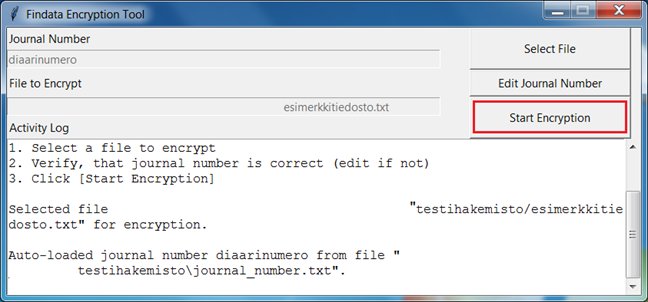
- Select ‘Start Encryption’ to begin the encryption process (see image below)

- Two new files will have appeared in your folder on the machine:
- one .c4gh file and
- one .json file
- Open the folder that matches the project’s journal number in Nextcloud
- Upload both files you created in step 9 to that Nextcloud folder
- Now, your Nextcloud folder should contain three files:
- journal_number.txt
- one .c4gh file
- one .json file
- Log out of the system.
- Notify data@findata.fi when the data has been transferred.
- Once the Findata processor has confirmed that your data has been transferred successfully, you must permanently delete all personal data from the extraction folder you created on your computer. Not therefore from the Nextcloud folder, but from the folder you created yourself.
- Empty the Recycle Bin on your computer in case you’ve delivered personal data.