On this page, you will find instructions on how to securely submit the extracted data or your own files to Findata, or how to request a data transfer from Findata. Data transfers are carried out through a secure transfer service, either via Tunneli or Supertunneli.
We request the materials from the controllers primarily in CSV format and deliver them to clients in CSV format (semicolon as separator, UTF-8 encoding).


Service descriptions for Tunneli and Supertunneli
Tunneli
Tunneli is a secure transfer service accessible via a web browser. It enables the encrypted delivery of personal data files to and from Findata.
Tunneli Setup Guide
Tunneli is used via a web browser. To use the service, you need user credentials, which can be requested through Findata’s e-service at asiointi.findata.fi.
If you already have Nextcloud credentials ordered through Findata, they will also work in Tunneli.
Using Tunneli requires a public IP address. Before requesting credentials, find out the public IP address of the network from which the data will be transferred.
The following addresses are not public and therefore cannot be used for data transfers:
- Addresses starting with:
- 10.
- 192.168.
- Addresses in the range:
- 172.16.0.0–172.31.255.255
- 224.0.0.0–239.255.255.255
If you are unsure about your IP address, please contact your organization’s IT support.
How to Use Tunneli
With Tunneli, data controllers can securely deliver extracted datasets, and customers (i.e. permit holders) can submit their own datasets, files, or software to Findata for combining.
In addition, Findata can use Tunneli to deliver combined datasets from multiple data controllers to other secure processing environments. Tunneli can also be used, for example, to transfer personal data from an individual data controller to a secure environment other than Findata’s Kapseli.
See detailed instructions below for different use cases:
Technical Features
Tunneli is used via a web browser and has a file size limit of 4 GB. Larger datasets must be transferred in multiple parts.
Supertunneli
Supertunneli is a secure transfer service implemented through an API interface. It is primarily intended for data controllers of social and healthcare datasets and for service providers of secure processing environments.
Supertunneli Setup Guide
Findata will contact the data sender and/or recipient organization to initiate the Supertunneli connection.
A contract regarding the deployment and use of the Supertunneli is made between Findata and the data controller or service provider of a operating environment (Service User). This contract must be signed by a representative of the Service User, who has the authority to sign on behalf of the organization.
Before signing the contract, the Service User must designate the person(s) responsible for setting up the Supertunneli, a contact person, and provide any additional required information.
Familiarity with REST APIs and S3 object storage formats is beneficial for the setup. Depending on the chosen implementation method, knowledge of installing and managing Python 3 and its libraries may also be useful.
How to Use Supertunneli
The Service User is free to choose how to implement the interface solution. Findata’s service provider, CSC, is responsible for providing technical guidance and, if necessary, reference implementations to facilitate deployment.
Before transmitting any personal data through the established connection, a technical test must be conducted. Once the test is successful, Findata will notify the Service User that the Supertunneli is ready for use.
The Service User is responsible for user management within their own interface and for ensuring that user authentication complies with the requirements of the Act on the Secondary Use of Health and Social Data.
Technical Features
Initially, 1 terabyte (1 TB) of space is allocated for data transfers via the Supertunneli. If the data to be transferred exceeds this limit, the transfer must be agreed upon in advance with Findata.
The data must be encrypted before transmission. The encryption process can be automated by the sender / Service User.
Instructions for controllers on data transfers
Notify the Findata contact person of the persons involved in the data transfer
Findata’s contact person is the sender of the data request.
Provide in your message the following information:
- Data permit journal number
- Organisation from which the data will be transferred
- The person who will receive the potential target group
- The person who will deliver the extracted data to Findata
Order a Tunneli ID
If you already have a Tunneli connection, proceed to the next step.
- Before logging in find out what is your organisations public ip address for the network from which the data is transferred. Please consult your organisations IT help in case you’re unsure about the IP address.
- The following addresses are not public and therefore cannot be used for transferring data:
- addresses that start with:
- 10.
- 192.168.
- or are between:
- 172.16.0.0 – 172.31.255.255
- 224.0. – 239.255
- Log into the Findata customer service at asiointi.findata.fi
- Under Submit application, select Order of a Tunneli user ID
- Complete and submit the form
- Notify us at data@findata.fi once the form has been submitted. If additional information is needed for registration, we will contactu you by email.
- When you receive confirmation from Findata that the connection has been established, proceed to the next step.
Encrypt the data and transfer it to Tunneli
- Log in to Tunneli transfer service: siirto.findata.fi
- Use the same authentication method as in other Findata’s services.
- Verify that the diary number is correct.
- The front page shows a folder with the title of the data permit decision’s diary number.
- Open the folder and check that the diary number in the file journal_number.txt is also correct.
- Create a new folder on your computer. Ensure that only individuals authorised to handle the data have access to this folder.
- Download the following files from Tunneli to the folder:
- Findata Encryption Tool (found in folder named Encryption Tools or Salaustyökalut in Finnish)
- csc.pub (found in folder named Encryption Tools)
- the journal_number.txt file
To download the file, click the three dots after the file and select ‘Download’.

- Compress all the files you want to transfer into a single .zip file and move them to the folder you previously created
- Make sure that the zip file size does not exceed 4 GB
- Include in the .zip file the data descriptions
- Include in the .zip file the data descriptions
- Do not password protect the .zip files
- Make sure the file is in the format specified in the data delivery request
- Make sure that the file name does not contain spaces or special characters (/,? +) [). The following special characters are permitted: dots, hyphens, and underscores (.- _)
- Open from the folder the Findata Encryption Tool
- Select the file for encryption
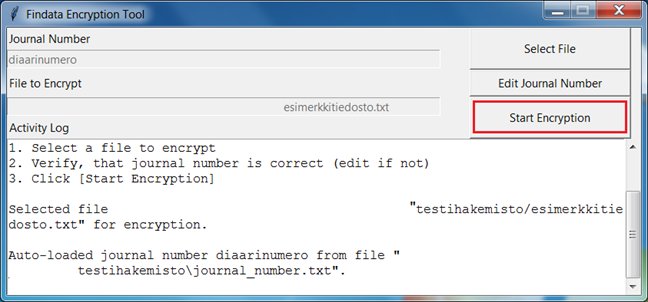
- The file you are encrypting is the zip file you created in step 5. Select a file by pressing ‘Select File’ (see image below)
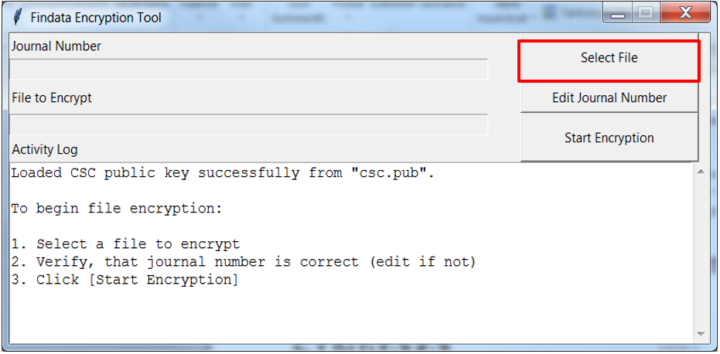
- Select ‘Start Encryption’ to begin the encryption process (see image below)
- Two new files will have appeared in your folder on the machine:
- one .c4gh file and
- one .json file
- Open the folder that matches the project’s journal number in Tunneli
- Upload both files you created in step 9 to that Tunneli folder (see image below)

- Now, your Tunneli folder should contain three files:
- journal_number.txt
- one .c4gh file
- one .json file
- Log out of the system.
- Notify data@findata.fi when the data has been transferred.
- Once the Findata’s processor has confirmed that your data has been transferred successfully, you must permanently delete all personal data from the extraction folder you created on your computer. Not therefore from the Tunneli folder, but from the folder you created yourself.
- Empty the Recycle Bin on your computer in case you’ve delivered personal data.
Instructions for customers on transferring their own data to Findata
Send a notification to data@findata.fi about your data
Provide in your message the following information:
- Data permit journal number
- Remote environment Kapseli code
- Your Tunneli ID if you already have a Tunneli connection.
- You can find your IDs by doing the following:
- Log into your Tunneli account.
- Go to the profile icon on the top right.
- Choose ‘Settings’.
- Your ID ends in FINDATA.local.
- You can find your IDs by doing the following:
Order a Tunneli ID
If you already have a Tunneli connection, proceed to the next step.
- Before logging in find out what is your organisations public ip address for the network from which the data is transferred. Please consult your organisations IT help in case you’re unsure about the IP address.
- The following addresses are not public and therefore cannot be used for transferring data:
- addresses that start with:
- 10.
- 192.168.
- or are between:
- 172.16.0.0 – 172.31.255.255
- 224.0. – 239.255
- Log into the Findata customer service at asiointi.findata.fi
- Under Submit application, select Order of a Tunneli user ID
- Complete and submit the form
- Notify us at data@findata.fi once the form has been submitted. If additional information is needed for registration, we will contactu you by email.
- When you receive confirmation from Findata that the connection has been established, proceed to the next step.
Fill in the Files to be sent to Kapseli form
- Fill in the form below and submit it to Findata via Tunneli in the same transfer folder together with the other files. Go to the next step.
- If you’re transferring data, submit its data description in the same transfer folder.
Files to be sent to Kapseli form (download Word file, 26 kB)
Encrypt the data and transfer it to Tunneli
- Log in to Tunneli transfer service: siirto.findata.fi
- Use the same authentication method as in other Findata’s services.
- Verify that the diary number is correct.
- The front page shows a folder with the title of the data permit decision’s diary number.
- Open the folder and check that the diary number in the file journal_number.txt is also correct.
- Create a new folder on your computer. Ensure that only individuals authorised to handle the data have access to this folder.
- Download the following files from Tunneli to the folder:
- Findata Encryption Tool (found in folder named Encryption Tools or Salaustyökalut in Finnish)
- csc.pub (found in folder named Encryption Tools)
- the journal_number.txt file
To download the file, click the three dots after the file and select ‘Download’.
- Compress all the files you want to transfer into a single .zip file and move them to the folder you previously created
- Make sure that the zip file size does not exceed 4 GB
- Include in the .zip file the data descriptions
- Include in the .zip file the data descriptions
- Do not password protect the .zip files
- Make sure the file is in the format specified in the data delivery request
- Make sure that the file name does not contain spaces or special characters (/,? +) [). The following special characters are permitted: dots, hyphens, and underscores (.- _)
- Open from the folder the Findata Encryption Tool
- Select the file for encryption
- The file you are encrypting is the zip file you created in step 5. Select a file by pressing ‘Select File’ (see image below)
- Select ‘Start Encryption’ to begin the encryption process (see image below)
- Two new files will have appeared in your folder on the machine:
- one .c4gh file and
- one .json file
- Open the folder that matches the project’s journal number in Tunneli
- Upload both files you created in step 9 to that Tunneli folder (see image below)
- Now, your Tunneli folder should contain three files:
- journal_number.txt
- one .c4gh file
- one .json file
- Log out of the system.
- Notify data@findata.fi when the data has been transferred.
- Once the Findata’s processor has confirmed that your data has been transferred successfully, you must permanently delete all personal data from the extraction folder you created on your computer. Not therefore from the Tunneli folder, but from the folder you created yourself.
- Empty the Recycle Bin on your computer in case you’ve delivered personal data.
Instructions for transferring other data
Complete the data transfer order form
According to the Secondary Use Act, a secure transfer service must be used when transferring personal data. For example, if you need to transfer personal data from an individual data controller to an environment other than Findata’s Kapseli, order the data transfer from Findata. The transfer will be conducted through the Tunneli transfer service.
- Order the data transfer by completing the form below.
- Download the form: Data transfer order form (Word file, 52.7 KB)
- Send the completed form to data@findata.fi.
Important notes
- Only the data controller can order the data transfer.
- The data controller is responsible for ensuring compliance with the conditions of data permits and amendments for the data being transferred.
- Both the data provider and recipient must have Tunneli IDs.
- Data transfers are subject to a fee. Fees are based on the amount of data transferred and the time required for the transfer.
- The hourly rate for providing data in accordance with a data permit is determined by the current Decree of Public Charges of the Ministry of Social Affairs.
- See the current prices in Findata’s price list.
Order a Tunneli ID
If you already have a Tunneli connection, proceed to the next step.
- Before logging in find out what is your organisations public ip address for the network from which the data is transferred. Please consult your organisations IT help in case you’re unsure about the IP address.
- The following addresses are not public and therefore cannot be used for transferring data:
- addresses that start with:
- 10.
- 192.168.
- or are between:
- 172.16.0.0 – 172.31.255.255
- 224.0. – 239.255
- Log into the Findata customer service at asiointi.findata.fi
- Under Submit application, select Order of a Tunneli user ID
- Complete and submit the form
- Notify us at data@findata.fi once the form has been submitted. If additional information is needed for registration, we will contactu you by email.
- When you receive confirmation from Findata that the connection has been established, proceed to the next step.
Wait for Findata to contact you
- Once we have received the completed data transfer form, we will begin processing it.
- If the form contains all necessary information, we will send you a confirmation of the order and the cost. You will also receive detailed instructions for transferring the data.
Encrypt the data and transfer it to Tunneli
- Log in to Tunneli transfer service: siirto.findata.fi
- Use the same authentication method as in other Findata’s services.
- Verify that the diary number is correct.
- The front page shows a folder with the title of the data permit decision’s diary number.
- Open the folder and check that the diary number in the file journal_number.txt is also correct.
- Create a new folder on your computer. Ensure that only individuals authorised to handle the data have access to this folder.
- Download the following files from Tunneli to the folder:
- Findata Encryption Tool (found in folder named Encryption Tools or Salaustyökalut in Finnish)
- csc.pub (found in folder named Encryption Tools)
- the journal_number.txt file
To download the file, click the three dots after the file and select ‘Download’.
- Compress all the files you want to transfer into a single .zip file and move them to the folder you previously created
- Make sure that the zip file size does not exceed 4 GB
- Include in the .zip file the data descriptions
- Include in the .zip file the data descriptions
- Do not password protect the .zip files
- Make sure the file is in the format specified in the data delivery request
- Make sure that the file name does not contain spaces or special characters (/,? +) [). The following special characters are permitted: dots, hyphens, and underscores (.- _)
- Open from the folder the Findata Encryption Tool
- Select the file for encryption
- The file you are encrypting is the zip file you created in step 5. Select a file by pressing ‘Select File’ (see image below)
- Select ‘Start Encryption’ to begin the encryption process (see image below)
- Two new files will have appeared in your folder on the machine:
- one .c4gh file and
- one .json file
- Open the folder that matches the project’s journal number in Tunneli
- Upload both files you created in step 9 to that Tunneli folder (see image below)
- Now, your Tunneli folder should contain three files:
- journal_number.txt
- one .c4gh file
- one .json file
- Log out of the system.
- Notify data@findata.fi when the data has been transferred.
- Once the Findata’s processor has confirmed that your data has been transferred successfully, you must permanently delete all personal data from the extraction folder you created on your computer. Not therefore from the Tunneli folder, but from the folder you created yourself.
- Empty the Recycle Bin on your computer in case you’ve delivered personal data.